Sinfar Wiki / Player ResourcesLeveling on Sinfar/Lotus Isles
Captain Rodrick → Lotus Isles - Ferry → optional Rii Nor–Veran Emporium → Lieren: Wu Jen Monastery - Grounds → portal dome → five training portals → optional regional finish.
Material gathering and overlapping training areas; choose encounters for your actual build
Complete five-portal set confirmed by maintainer; sign bands through 33; external finish from older sources
Route at a glance
- Arrival / any level — Captain Rodrick → Lotus ferry → Wu Jen Monastery portal hub
- Optional preparation — Rii Nor–Veran Emporium: pre-made starter gear
- Levels 1–7 — Toad Away
- Levels 1–10 — Trouble In Paradise
- Levels 6–16 — Hag Ridden
- Levels 13–23 — A Reptile Dysfunction
- Levels 15–33 — Going Ape
- About 25/27–35 — Optional earlier departure: outsiders or yetis
- Around 33–40, when ready — Screaming demons or Cathedral exterior
The five training portals
| Area | Sign range | Listed materials |
|---|---|---|
| Toad Away | 1–7 | animal hearts |
| Trouble In Paradise | 1–10 | monster scales, beetle bellies |
| Hag Ridden | 6–16 | Human Heads, Vampire Teeth |
| A Reptile Dysfunction | 13–23 | Dragons Blood, Monster Scales |
| Going Ape | 15–33 | Golem Hands, Spider Hair |
Arrival / any level — Captain Rodrick → Lotus ferry → Wu Jen Monastery portal hub
Go: From the OOC Area, enter the IC Portal and find Captain Rodrick by his boat. The pictured dialogue is in Sinfar Island - Sinifer City - Halcyon Ward. Select “Lotus Isles - Ferry” (option 6 in this menu). On the ship, speak to the ferrywoman and select “[Lotus Isles] Lieren: Wu Jen Monastery - Grounds” (option 9). Follow the path ahead to the large portal dome; enter it to reach the circular training-portal platform.
Hunt: Exploration is an optional way to gain early XP. The maintainer reports that Rodrick offers the same destination conversation at his landing boats, so you can tour destinations before training.
Prepare: Read each portal sign before entering. !OOC accesses the OOC Area; !IC returns to your previous in-game location, according to the maintainer’s firsthand report. Use destination names if menu numbering changes.
Keep: Save the materials dropped in the training areas for forging.
The screenshot spells the captain’s name Rodrick. The ferry destination is Lieren: Wu Jen Monastery - Grounds; the old Shin Khitai/Mesa Pagoda wording is not needed for this documented approach. The photographs establish displayed choices and the dome; the transition sequence and chat commands come from the firsthand report.
Select a screenshot to read the original.
-
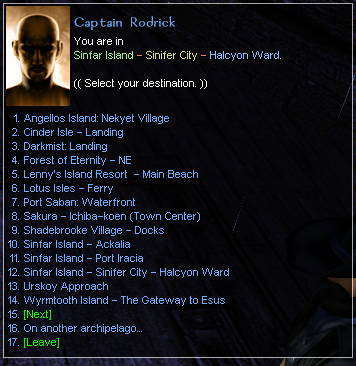
Captain Rodrick destination menu
-
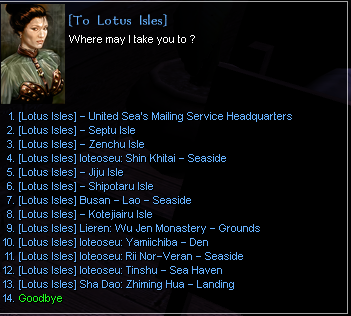
Lotus ferry destination menu
-
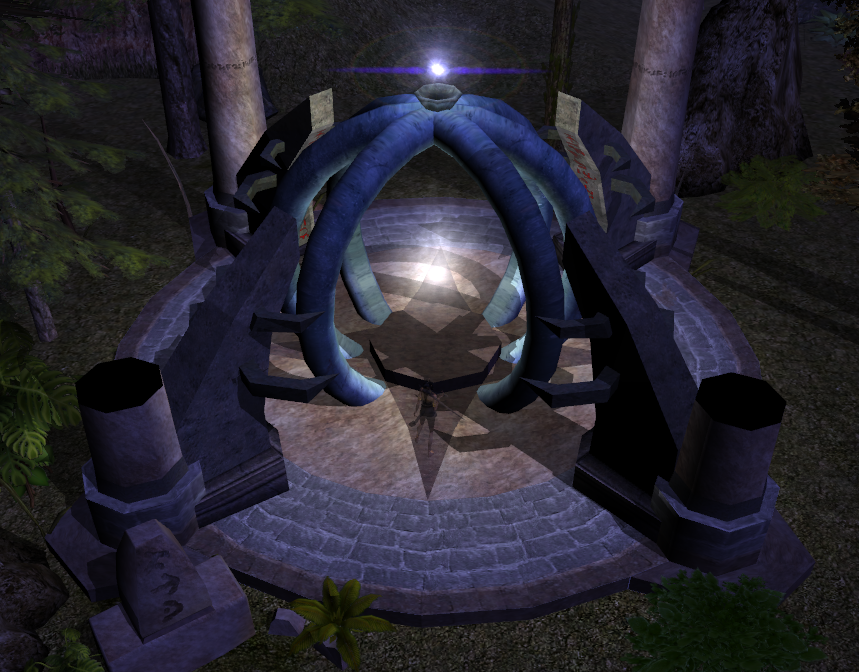
Portal dome on the monastery grounds
Optional preparation — Rii Nor–Veran Emporium: pre-made starter gear
Go: From the same Lotus ferrywoman, choose “[Lotus Isles] Ioteoseu: Rii Nor - Veran - Seaside” (option 11 in the supplied menu). Follow the dock straight ahead, pass through the small doorway, then enter the building on the right: the Emporium. Inside, speak to the NPC across the room in ceremonial kimono-style clothing. After shopping, return to the ferry and select Lieren: Wu Jen Monastery - Grounds.
Hunt: Optional shopping stop before training; use gold to obtain a usable starter kit while you gather forging components.
Prepare: Budget around 20,000 gold per piece according to the maintainer, then check the actual purchase price in the store and whether your character can equip the item. Consider DEX for extra AC, as the maintainer recommends, while checking your worn armour’s Maximum Dexterity Bonus.
Keep: Photographed examples: Bewitched Battle Garb (+3 AC Armor Modifier); Hopping Boots (+3 AC Dodge Modifier); Ensorcelled Rapier (+3 enhancement); Climber’s Belt (+2 Dexterity). The maintainer also reports rings/amulets with +3 AC or +2 STR, DEX, WIS, CHA or INT; their item windows are not pictured.
The item windows show Value GP 20,001 for the garb/boots, 5,020 for the rapier and 14,001 for the belt. These are displayed item values, not confirmed purchase prices. Ring/amulet choices and the broader stock description are firsthand reports; their individual item properties are not pictured. No exact minimum equip level was established.
Sources: L010 · L003 · L011 · L012 · L013 · L014 · L015 · L016 · L017 · W001
Select a screenshot to read the original.
-
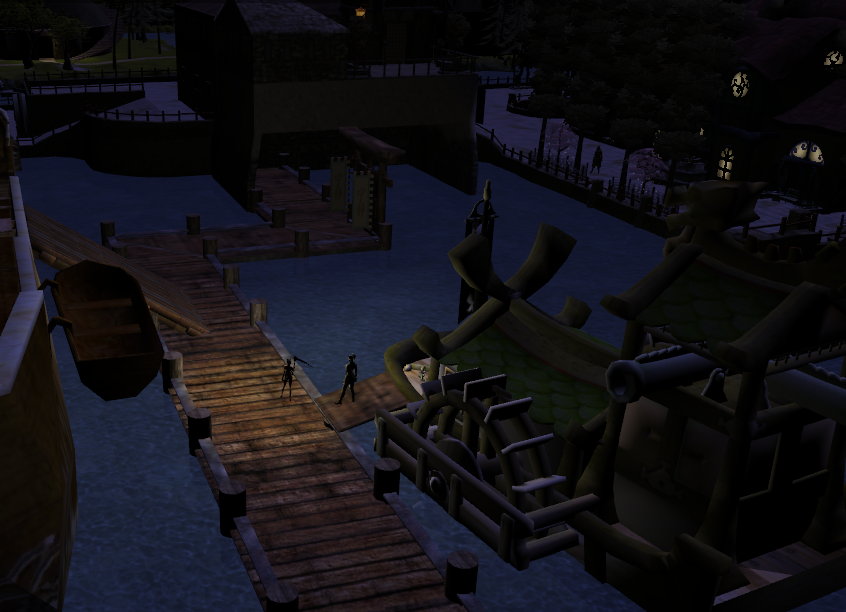
Rii Nor–Veran dock approach
-
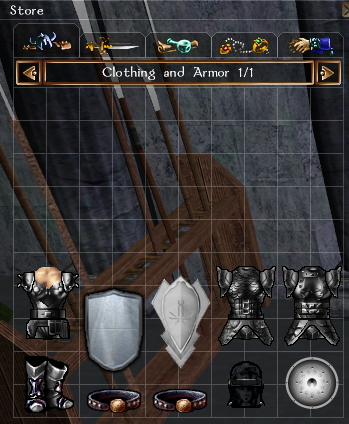
Emporium clothing and armour inventory
-

Bewitched Battle Garb
-
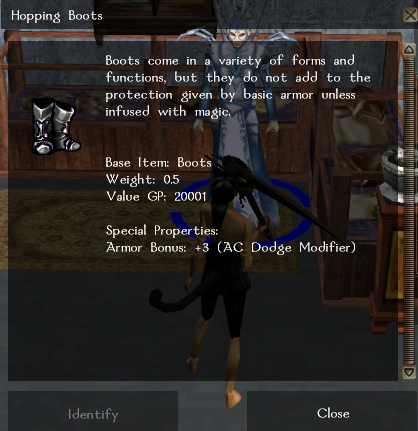
Hopping Boots
-
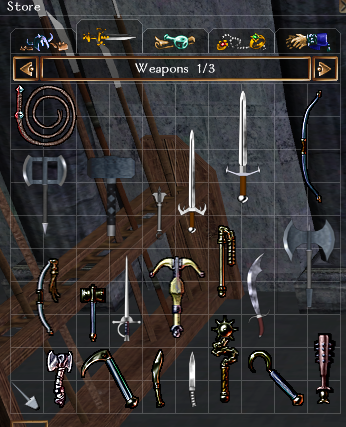
Emporium weapons inventory
-

Ensorcelled Rapier
-
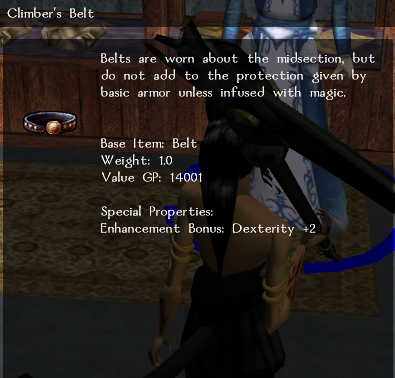
Climber’s Belt
Levels 1–7 — Toad Away
Go: From the central training platform, choose the portal beside the “Toad Away” sign.
Hunt: Fight frogs and toads.
Prepare: Return to a road or shrine and let creatures come to you to manage the pace of respawns. Stay on the road when passing through so you do not spawn creatures. Listed resting places: Roads and shrines of Umberlee.
Keep: animal hearts.
The sign explicitly states an XP range of 1–7.
Sources: L005
Select a screenshot to read the original.
-
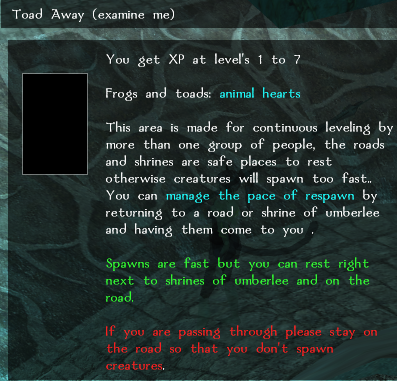
Toad Away sign
Levels 1–10 — Trouble In Paradise
Go: From the central training platform, choose the portal beside the “Trouble In Paradise” sign.
Hunt: Fight bugs, leeches and turtles.
Prepare: Return to a road or shrine and let creatures come to you to manage the pace of respawns. Stay on the road when passing through so you do not spawn creatures. Listed resting places: Roads and shrines of Umberlee.
Keep: monster scales, beetle bellies.
The sign explicitly states an XP range of 1–10.
Sources: L006
Select a screenshot to read the original.
-
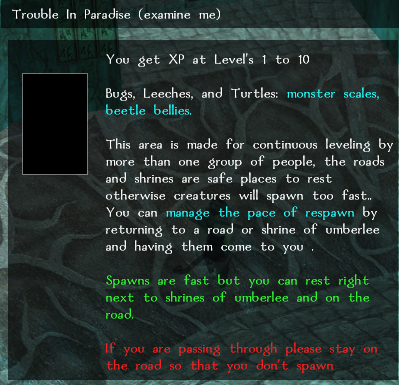
Trouble In Paradise sign
Levels 6–16 — Hag Ridden
Go: From the central training platform, choose the portal beside the “Hag Ridden” sign.
Hunt: The sign does not name the monster types. Test the local encounters with your character before committing to a longer run.
Prepare: Fast respawns: return to a shrine and let creatures come to you to manage the pace. The sign identifies shrines as resting places. Listed resting places: Shrines of Umberlee.
Keep: Human Heads, Vampire Teeth.
Select a screenshot to read the original.
-
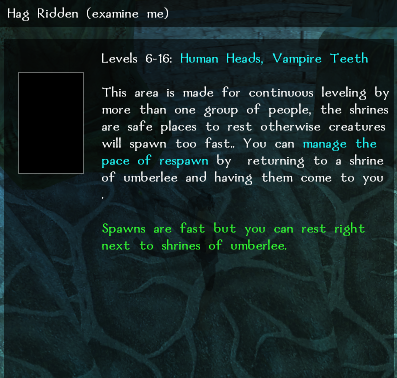
Hag Ridden sign
Levels 13–23 — A Reptile Dysfunction
Go: From the central training platform, choose the portal beside the “A Reptile Dysfunction” sign.
Hunt: The sign does not name the monster types. Test the local encounters with your character before committing to a longer run.
Prepare: Fast respawns: return to a shrine and let creatures come to you to manage the pace. The sign identifies shrines as resting places. Listed resting places: Shrines of Umberlee.
Keep: Dragons Blood, Monster Scales.
The sign explicitly states an XP range of 13–23.
Sources: L008
Select a screenshot to read the original.
-

A Reptile Dysfunction sign
Levels 15–33 — Going Ape
Go: From the central training platform, choose the portal beside the “Going Ape” sign.
Hunt: The sign does not name the monster types. Test the local encounters with your character before committing to a longer run.
Prepare: Manage respawns by going to water after spawning creatures. Encounters get harder the deeper you go. Passing another party with permission, and letting other parties pass when staying in one area, is preferred but not enforced. Listed resting places: Streams and water.
Keep: Golem Hands, Spider Hair.
The sign explicitly states an XP range of 15–33.
Sources: L009
Select a screenshot to read the original.
-
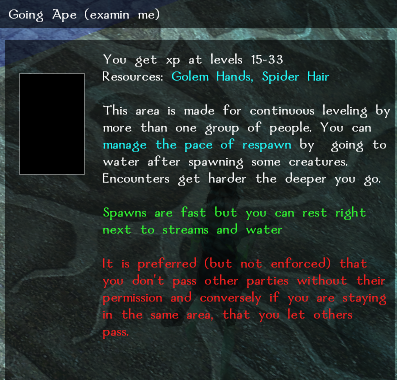
Going Ape sign
About 25/27–35 — Optional earlier departure: outsiders or yetis
Go: Option A: Forest of Eternity spiders → central cavern → harpies → succubi/imps/fire elementals. Option B: Hivernales via Captain Anienka in Mur County Center.
Hunt: Use the outsider circuit for a prepared caster; consider yetis only when physical defenses are ready.
Prepare: Fire and mind protection for the outsider branch; high physical defenses and daze protection for yetis. Avoid bosses.
Keep: Outsider components, or giant hearts and equipment from yetis.
Around 33–40, when ready — Screaming demons or Cathedral exterior
Go: Use the detailed final-stage directions in the classic circuit.
Hunt: Choose the finish matching your defenses and spells.
Prepare: Check the chosen finish’s own entry advice: the detailed circuit uses about 30/35–40 for screaming demons and 33/35–40 for the Cathedral exterior. Prepare sonic protection for screamers, and appropriate saves, spells and rest points for the Cathedral.
Keep: Late XP and route-specific drops.
Changes and conflicting advice
Lotus signs replace the old approximate bands
The photographed signs give Toad Away 1–7, Trouble In Paradise 1–10, Hag Ridden 6–16, A Reptile Dysfunction 13–23 and Going Ape 15–33. Older reports describe departures around 20–22, 27 or 30, and include a struggling level-15 fighter. The newer evidence supports exact advertised bands, not universal ease for every build.
Use the sign ranges and area-specific rest advice. Keep older combat tactics identified as player reports, and let actual XP and survivability determine when to move. Kung Fu Panda is an older material reference; it is not one of the five portals confirmed in the current hub.
L001 · L005 · L006 · L007 · L008 · L009 · F85956 · F88888 · D012 · D976 · D990
Connected routes
Use these guides for the alternative starts, connecting stages and late-level finishes mentioned above.
Classic Sinifer Circuit · Icenfar · Saban
Report a change
Found a changed area, monster or route? Please report it to the team in Discord #leveling. Include the guide name, exact area and server, your character level/class, what changed, and when you checked it. A screenshot or current in-game description helps us update the right step.
Guide: Leveling on Sinfar/Lotus Isles. Use the Discussion tab if you prefer to leave a wiki note. Player reports will help keep these guides current.
Sources and attribution
Original authors, displayed dates and message/post IDs are retained below. Discord links may require Sinfar server access. Initial research: 15 October 2026; Player Tool and Lotus field evidence: 16 October 2026.
- D012 — Maiden; 7/13/25, 12:14 AM. #leveling · Original message ID: 1393807698084102176. (edited)
- D868 — AuraRei; 2/9/26, 7:42 AM. #leveling · Original message ID: 1470399576086155437.
- D955 — Arytiss; 7/16/26, 2:53 AM. #leveling · Original message ID: 1527206477129977927.
- D965 — Dusk Sarsis; 8/30/26, 12:35 PM. #leveling · Original message ID: 1543660451949187072.
- D976 — Mark5720; 10/3/26, 4:54 AM. #leveling · Original message ID: 1555865629100343347.
- D990 — Mark5720; 10/3/26, 8:49 AM. #leveling · Original message ID: 1555924693989589116. (edited)
- F66383 — Mew; Sun Nov 23, 2014 5:28 pm. Re: Different hunting grounds than crypts for lvl 12 · Original post ID: p66383.
- F78277 — Ghengra; Fri Dec 18, 2015 1:42 pm. Re: Arche Terre Leveling · Original post ID: p78277.
- F85956 — DM Cats; Tue Aug 02, 2016 6:13 am. Re: Sinfars Levelling Guides · Original post ID: p85956.
- F88885 — Carcerian; Thu Oct 13, 2016 5:56 am. How To level up quickly (The Sinfar Circuit) · Original post ID: p88885.
- F88888 — Prestige; Thu Oct 13, 2016 10:48 am. Re: How To level up quickly (The Sinfar Circuit) · Original post ID: p88888.
- F88889 — Artimas; Thu Oct 13, 2016 11:15 am. Re: How To level up quickly (The Sinfar Circuit) · Original post ID: p88889.
- F93502 — Ghengra; Thu Mar 09, 2017 1:21 pm. Ghengra's AT Leveling Guide ("AT Route") · Original post ID: p93502. Last edited by Ghengra on Thu Aug 03, 2017 6:22 pm, edited 25 times in total.
- F96736 — Zae; Sun Jun 04, 2017 12:09 pm. Re: Sinfars Levelling Guides · Original post ID: p96736.
- F97791 — My Dark Avatar; Tue Jul 18, 2017 12:25 pm. Re: New Player Perspective · Original post ID: p97791.
- L001 — Guide maintainer (user); Reported 16 October 2026. Firsthand Lotus travel and OOC/IC report New characters enter the OOC Area. Enter the IC Portal to reach the game world. !OOC accesses the OOC Area and !IC returns to the previous in-game location. Captain Rodrick appears by his boat at landing areas with the destination dialogue; touring his destinations is useful for exploration XP. Choose Lotus Isles, then the ferrywoman and Wu Jen Monastery Grounds. Follow the path ahead to the large portal dome. It leads to a central platform with portals arranged in a circle and signs beside them. The maintainer explicitly confirmed that these five distinct signs cover the full portal set.
- L002 — Guide maintainer (user); in-game text credited to Sinfar; Supplied 16 October 2026; screenshot capture date not shown. Captain Rodrick destination menu View screenshot.
- L003 — Guide maintainer (user); in-game text credited to Sinfar; Supplied 16 October 2026; screenshot capture date not shown. Lotus ferry destination menu View screenshot.
- L004 — Guide maintainer (user); in-game text credited to Sinfar; Supplied 16 October 2026; screenshot capture date not shown. Portal dome on the monastery grounds View screenshot.
- L005 — Guide maintainer (user); in-game text credited to Sinfar; Supplied 16 October 2026; screenshot capture date not shown. Toad Away sign View screenshot.
- L006 — Guide maintainer (user); in-game text credited to Sinfar; Supplied 16 October 2026; screenshot capture date not shown. Trouble In Paradise sign View screenshot.
- L007 — Guide maintainer (user); in-game text credited to Sinfar; Supplied 16 October 2026; screenshot capture date not shown. Hag Ridden sign View screenshot.
- L008 — Guide maintainer (user); in-game text credited to Sinfar; Supplied 16 October 2026; screenshot capture date not shown. A Reptile Dysfunction sign View screenshot.
- L009 — Guide maintainer (user); in-game text credited to Sinfar; Supplied 16 October 2026; screenshot capture date not shown. Going Ape sign View screenshot.
- L010 — Guide maintainer (user); Reported 16 October 2026. Rii Nor–Veran Emporium access, stock and approximate prices From the Lotus ferrywoman, take Rii Nor–Veran. Follow the dock straight ahead, pass through the small doorway, then enter the building on the right, the Emporium. Speak to the NPC across the room in ceremonial kimono-style clothing. The maintainer reports pre-made low-level gear at about 20,000 gold per piece: +3 AC armour, +3 weapons, and rings/amulets with +3 AC or +2 STR/DEX/WIS/CHA/INT. The maintainer recommends DEX for extra AC.
- L011 — Guide maintainer (user); in-game text credited to Sinfar; Supplied 16 October 2026; screenshot capture date not shown. Rii Nor–Veran dock approach View screenshot.
- L012 — Guide maintainer (user); in-game text credited to Sinfar; Supplied 16 October 2026; screenshot capture date not shown. Emporium clothing and armour inventory View screenshot.
- L013 — Guide maintainer (user); in-game text credited to Sinfar; Supplied 16 October 2026; screenshot capture date not shown. Bewitched Battle Garb View screenshot.
- L014 — Guide maintainer (user); in-game text credited to Sinfar; Supplied 16 October 2026; screenshot capture date not shown. Hopping Boots View screenshot.
- L015 — Guide maintainer (user); in-game text credited to Sinfar; Supplied 16 October 2026; screenshot capture date not shown. Emporium weapons inventory View screenshot.
- L016 — Guide maintainer (user); in-game text credited to Sinfar; Supplied 16 October 2026; screenshot capture date not shown. Ensorcelled Rapier View screenshot.
- L017 — Guide maintainer (user); in-game text credited to Sinfar; Supplied 16 October 2026; screenshot capture date not shown. Climber’s Belt View screenshot.
- W001 — Sinfar wiki contributors; Last modified 16 September 2026, 16:02. Magical Items · Original post ID: 1360.